Instructions
Requirements
Installation
Launchpad button functions
Keyboard mode
Control matrix mode
Pattern load mode
FAQ
Requirements: What Hardware and Software do I need to run the plugin?
The Lauflicht Step Sequencer requires the following Hard/Software:
- one or more Novation
Launchpad,
Launchpad S or Launchpad Mini
(the plugin supports up to four Launchpads/Launchpads S/Launchpads Mini) - Renoise (free or full version)
- Please make sure you have properly installed Renoise 3.0 or higher (free or full version).
- Run Renoise, unzip the downloaded zipfile and drag and drop the plugin (the file ending with ".xrnx") into the Renoise application window. Please select the right bit version of the tool. If your Renoise version is 32bit use the 32bit version of the tool, otherwise use the 64bit version. The tool will be installed automatically, detect your Launchpad(s) and is available in the drop down menu "Tools".
- A good beginning is to load the example song by dragging it also into the Renoise application window and start step sequencing. :) Of course you can also load your own songs, samples, VSTi or MIDI instruments and start.
Control buttons:
- page up ("learn"): page through the tracks: select the 7 tracks before current view.
- page down ("view"): page through the tracks: select the 7 tracks after the current view.
- page left: page to the previous 8 steps, if step length is set to 16 or 32.
- page right: page to the next 8 steps, if step length is set to 16 or 32.
- session: turns keyboard mode on off (explanation see below)
- user1: set editstep (note resolution). red: editstep 1 (highest), green: editstep 2 (medium), amber: editstep 4 (lowest) - this means: each step of a row represents every (1), every second (2), every fourth (4) note of the pattern.
- user2: select next page of the next 8, 16 or 32 rows of the pattern (dependant on the set steplength in the preferences of the step sequencer), if the pattern length is greater than 32. Adjusting the pattern length to a value other than 64 can cause errors and is not recommended.
LED matrix:
- LED Matrix first row: the moving light which shows the current play position of the sequencer when playing. These buttons are not editable
- LED Matrix rows #2-#8: each row represents a track, which must be bound to an instrument (sample, VSTI or MIDI). Each button of the row represents a step of the pattern according to the selected note resolution (editstep).
- play button: clears all selected steps on the selected row, regarding the selected note resolution.
The basic goal of the keyboard is to create melodies and chords in a much easier way. When activated via the "session" button, a virtual keyboard of one octave range on rows 7 and 8 appears. The keyboard mode does not affect the other functionalities in any way (navigation through the tracks, setting editstep, page, etc.), so that you can use the sequencer as usual with the possibility to create easy melodies and chords
- create a melody: To set a note, simply press on a key on the virtual keyboard (a button of the rows 7 and 8), and then on a step in the sequencer. The keyboards starts with the note 'C' and reflects a complete octave range, up to the note 'B' (aka 'H'). To determine the length of a note you can use the key 'Off' (button 8-9, in the virtual keyboard the key is marked with a cross, see picture above). The selected note is highlighted green. To change the octave press button the most outer right button (7-8) for octave up and the most outer left button (7-1) for octave down. The selected octave is highlighted yellow.
To create a melody just repeat pressing a key and a step alternating as long as you are finished.
Tip: You can also map every key of the virtual keyboard (including octave up/down buttons) to a key of a midi-keyboard. So you can combine setting a note value on your midi-keyboard and push a button on the Launchpad to set the note value.
- to create chords: just switch to another note number by pressing button 7-9 and set the note value for every of up to three notes. If finished, click on a step in a track to set the chord.
LED matrix:
- button 7-1: octave down
- buttons 7-2, 7-3, 7-5, 7-6, 7-7: the black keys starting with C#
- button 7-8: octave up
- button 7-9: switch note number, yellow: note1, green: note2, red: note3
- buttons 8-1 to 8-7: the white keys starting with C#
- button 8-8: clear note
- button 8-9: note off
- selected note:the currently selected note of the given note number is highlighted green
- selected octave number: a yellow light in row 8 indicates the currently set octave number and changes if a new octave is set accordingly. The first button indicates octave 1, the second octave 2, ... until the eighth button which indicates octave 8.
Features:
- midi mapping: all keys and buttons are midi mapable. So it is possible to assign the octave to a midi keyboard and set the notes with the keyboard, and set the note number switch to another midi controller.
- the notes are remembered when closing the keyboard mode or the entire sequencer and opening it again
- the mode does not affect the other functionalities in any way (setting editstep, page, etc.)
- includes clear note "--" and note off
- the new note value affects only the tracks in which a step was set. When leaving the keyboard mode again, the initial note value will be set again and not the note value set in the keyboard mode. This prevents setting wrong notes in wrong tracks accidentially.
With the controller matrix it is possible to control up to 8 different parameters per track, like Filter-Cutoff, Velocity, Delay, any midi/vsti cc parameter of every single step. Even the Note value (including note length) of each step can be modified in real-time. So it is very easy and a lot of fun to change the notes of a melody while playing the pattern. Playing around with these parameters in the matrix will often give some unexpected and great results, which will boost the variety of your track. Furthermore you can assign every step of the matrix to your favorite midi-controller. With a midi-controller with at least 8 or 16 knobs (like Doepfer Pocket Dial, Korg nanoKontrol2, Behringer BCR2000 or similar) the matrix can be controlled in an excellent way.
Features:
- control cutoff, delay, velocity, note value, or any other controllable parameter for every single step
- up to 8 different control parameters per track
- every parameter of the matrix (that means: every step) midi controllable
- changes are written in the pattern in real time
The parameters are grouped into three control types:
- Automation Efx: any midi/vsti CC (e.g. Cutoff, Resonance of the used synthesizer in the track)
- Pattern Efx: Velocity, Delay, Glide, and any other Renoise pattern effects etc.
- Notes: Up to 3 note columns per track, with a note range from C0 to B9, including note 'Off' to determine the note length.
Pattern load mode uses the first pattern in a song sequence (pattern 0) as a workspace into which you can load tracks from up to 16 other patterns in real time. Loop pattern 0, enter pattern load mode by pressing the top right button, and use the buttons shown in the diagram below to load tracks from the other patterns in your song sequence. Lauflicht loads patterns by copying tracks from the selected pattern into pattern 0 - any changes you make while working with pattern 0 will not affect the pattern you copied from, so you can easily revert any changes you make by loading the pattern again.
Each pattern is divided into "Deck A" and "Deck B". "Deck A" contains the first half of the tracks of the pattern, "Deck B" the second half. You can load the first half of the tracks from one pattern and mix them with the second half of the tracks from another pattern.
Example: Say you have a song consisting of ten patterns with 12 tracks. Selecting the pattern number 4 of "Deck A" (press button 2-4) replaces the first six tracks of pattern 0 with the first six tracks of pattern number 4. The last six tracks of pattern 0 are still the same. Next, selecting the pattern 5 of "Deck B" (press button 5-5) replaces the last six tracks of pattern 0 with the last six tracks of pattern 5. The first six tracks of pattern 0 are untouched, they are still the previously loaded tracks of pattern 4.
The pattern load mode enhances the variety of sequencing in live situations. You can switch to different patterns instantly while playing and even mix up patterns to have nice changeovers or surprising breaks in your performance.
How to setup:
To use the pattern load mode properly you have to prepare your song in the following way:
- Create a song with up to 16 different patterns, having an empty pattern 0 at the first position of the song sequence. Fill the other patterns with your music. The pattern sequence should be sorted.
- Loop the pattern 0 and press play.
- Enter the pattern load mode and start loading patterns
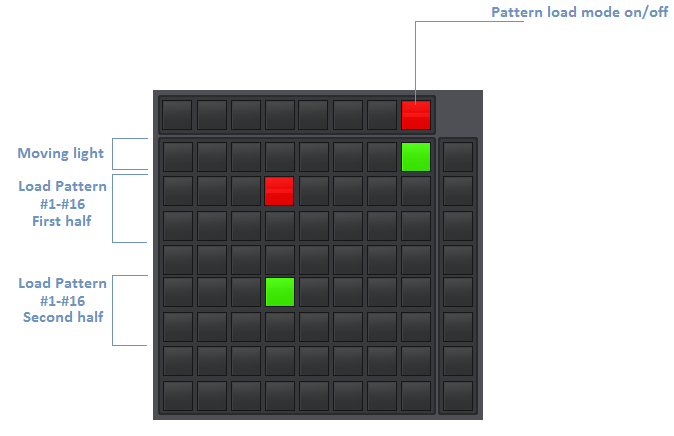
LED matrix:
- button 2-1 to 2-8: load pattern 1-8 of Deck A (first half of tracks)
- button 3-1 to 3-8: load pattern 9-16 of Deck A (first half of tracks)
- button 5-1 to 5-8: load pattern 1-8 of Deck B (second half of tracks)
- button 6-1 to 6-8: load pattern 9-16 of Deck B (second half of tracks)